Wednesday, July 24, 2013

1 Cake and 200 Cupcakes!

 What a busy year this has been! I hadn't realized how long it had been since I last posted on the blog! This spring and summer have been amazing! We haven't had rain in a few weeks, so I've been watching my garden flourish. I've spent much of my summer outdoors, working in the sunshine and tending to my garden. My family has been enjoying the fruits of my labor with fresh snow peas, beets, zucchini, and fresh herbs! My tomatoes are beginning to ripen and everything is on track for an amazing harvest.

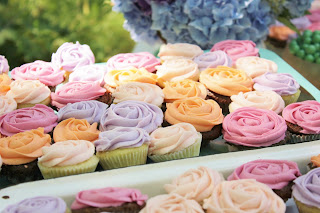
Last weekend, I also had the joy of witnessing two dear friend renew their wedding vows. After 10 years of marriage, they made the decision to say I do to each other again. What a blessing they are in my life, and a true inspiration. For the celebration, my sister in law, Kristine, and I teamed up to make nearly 200 cupcakes - 1/2 chocolate and 1/2 vanilla bean, both topped with a vanilla buttercream piped to look like a rose blossom. We chose 4 colors based on the colors of the ceremony - pale pink, fuchsia, coral, and lavender. We knocked them out in a day, but it was rather labor intensive! My sister in law is also pregnant, so I'm sure she was even more sore than I was after that day. Here are a few pictures of the final cupcakes, displayed at the ceremony.
The display table, before the cake was placed


 On the side, I managed to put together a small cake as a surprise for the bride and groom. I made a 4 layer milk chocolate cake, brushed with a Kahlua simple syrup, filled with a rich chocolate ganache, and topped with a vanilla buttercream.  I tinted the icing to a warm champagne color, then piped white icing in a whimsical paisley design. To finish the base, I wrapped a rusty colored burlap ribbon, and tucked a crocheted lace ribbon under the edge. The lovely cake topper was put together by my friend and sister of the bride, Aubrey. She did an amazing job on it! After the cake topper was placed, I scattered individual hydrangea blossoms around the base and top of the cake. Here is the finished cake!
The completed cake!
 

Friday, December 14, 2012

Company Christmas Party

In December of 2012, I was asked to prepare food and organize our company Christmas party. While I admit it was a lot of work, I love the reward of seeing everything put together and hearing how much everyone enjoyed it! My friend Mary was a gracious host, opening up her home as the venue and helping prepare some of the food! Here are a few pictures of the food from the party...


Monday, November 12, 2012

Rotary Auction Dessert

Since my husband is a Rotarian, I was asked to make a dessert for the annual Rotary Gala, which includes a silent and live action, as well as a meal. The desserts made were auctioned off by the table! Thought I would share a picture of mine - a Rich Chocolate Cheesecake! I piped semisweet chocolate into tree shapes, then brushed them with Lusterdust (and edible metallic glitter of sorts). I used a chocolate ganache to attach them to the cheesecake. Here is how I made the trees...
Chocolate must be tempered when you attempt to pipe it. The easiest way is to chop the chocolate you want to melt, take 3/4 of it and place in a microwave safe bowl. Microwave in 20 second increments, stirring in between, until chocolate is melted. Immediately dump in the remaining 1/4 of the chocolate and stir until it melts. Once melted, I just pour it into a plastic resealable bag fitted with a small, plain tip (1/8"-1/4" opening) and pipe the chocolate onto a sheet tray lined with parchment paper. It only took 20 minutes or so for my trees to set up. I didn't attach the trees until shortly before service, I didn't want the moisture of the cake to wilt the trees.

Here is a picture!
Creamy Chocolate Cheesecake

Monday, October 15, 2012

Roasted Creamy Tomato Soup

With all the fresh heirloom tomatoes coming out of my garden, I decided to make my own tomato soup. This recipe made 14 1/2 pints, which I canned in my pressure canner. Here is what I did...


Roasted Creamy Tomato Soup ©
Roasted Creamy Tomato Soup

12 1/2 lbs mixed tomatoes (I used heirlooms in yellow, purple, green, red, and brown, along with Roma tomatoes)
6 large sweet onions
2 bulbs garlic
1/4 cup + 1/4 cup balsamic vinegar
1/4 cup cream sherry
3 quarts chicken stock
3 tablespoons agave syrup (or other sweetener), OPTIONAL
Extra virgin olive oil
Salt/pepper
2 bay leaves
1/2-1 teaspoon smoked paprika
1 teaspoon sweet paprika
1/2 teaspoon nutmeg
 
Preheat oven to 425 degrees. Halve or quarter tomatoes, place on sheet pans, drizzle with a little olive oil, season with salt and pepper, and roast in oven until soft and lightly caramelized (around 30 minutes). Because this is a bigger batch, I used 5 sheet trays. This step can be done ahead of time. I spread this out over a couple of days, as my tomatoes ripened.
Cut onions in half and slice. I used a food processor to make quick work of this! In a large saucepan, heat 1 tablespoon of olive oil, then add onions. Immediately add salt and cook over low/medium heat until unions are soft and caramelized. Add cream sherry and 1/4 cup balsamic vinegar to the pan and cook an additional 5 minutes. This step can also be done ahead of time.
Slice off tops of garlic bulbs to expose the cloves. Place in a small pan, drizzle with olive oil, and roast in a 425 degree oven until golden brown and caramelized, about 30 minutes. Allow to cool, then squeeze out the cloves. (Once again, this step can be done ahead of time!)
In a large stockpot, combine roasted tomatoes, caramelized onions, and roasted garlic. Add chicken stock. Bring to a boil, then reduce to a simmer. Add bay leaves, sweet and smoked paprika, and nutmeg. Simmer over medium-low heat for about 45 minutes. Remove bay leaves. Using a food processor, puree soup in batches. Strain through a coarse strainer to remove seeds and tough pieces of skin. Stir in remaining 1/4 cup of vinegar and cook for 5 minutes. Taste for seasoning...I added the agave just to enhance the tomatoes sweetness, but it is to your taste!  Season with salt and pepper.
Ladle into hot, sterilized pint jars (I like the look of wide-mouth stout pint jars), clean rims, and apply sterilized caps. Follow your manufacturers instructions for your pressure canner. Process at 11 lbs pressure, 60 minutes for pints, 70 minutes for quarts.

When you are ready to open up a jar, just bring to a boil in a saucepan, reduce heat, and add cream or milk to taste. Freshly sliced basil sprinkled on top would be delicious!
 
I hope I remembered everything, but you can adjust the flavors according to your taste.
 
Enjoy!  
 

Tuesday, August 21, 2012

Blackberry Pie

Since it's such a great time of year for pies, I thought I would share my recipe for Blackberry pie!
First off, the crust. There are two types of crust - flaky and mealy. Mealy crust are used for single crust pies, such as pumpkin pie to prevent a soggy crust. Most other pies, usually with top and bottom crust, require a flaky crust.

Here is my recipe:

Pie Crust
2 cups flour
1 cup shortening
1 tablespoon sugar (optional)
1/2 cup ice cold water

Measure water, then add a few ice cubes. Set aside. Stir together flour and optional sugar, then cut the shortening in. Make sure that you leave the shortening in large pieces, about the size of raisins. This is what makes a flaky crust!
Drizzle the water over the mixture and gently stir - don't over mix or your crust will be tough. Stir just enough for the water to moisten the flour. I usually use my hands to press it together so I don't over mix. Shape into a disk and wrap in plastic wrap. Chill. (The disc can also be placed in a freezer bag and frozen for a couple months. Just place in the fridge the night before to thaw). When ready to use, remove from fridge, cut in half. Return one portion to fridge while you are rolling out the first. Gently form into a round, then lightly dust with flour, but don't overdo or crust will be tough. Gently roll until dough is about 1 inch larger than pie plate. Place crust into a greased pie plate (9 inch). Make sure all excess flour is brushed off. Don't stretch the crust, or it will shrink during baking. Add desired filling. Follow same procedure for rolling out the second piece. Lay over pie, then roll all the excess under and shape to form an even crust. Shape as desired. I cut a few slits in the top to allow the steam to escape so the crust doesn't become soggy.

I like the little touch of sugar, because it makes the crust brown a bit better. If you are using it for a savory pie, such as chicken pot pie, I would omit it. You can also use an egg wash over the top ( 1 egg yolk and a few tablespoons of milk) to make the top glossy. Just brush it on sparingly, so you don't end up with lumps of scrambled eggs.
To make a mealy crust, simply cut recipe in half and work the shortening into the flour until it resembles breadcrumbs, then continue as above.

For the filling, I use 5-6 cups of berries, depending on how full you like your pies.

Blackberry Pie

5 cups fresh blackberries
1 cup sugar (Use less for sweet berries, more for tart ones)
2/3 cup flour
1/4 teaspoon nutmeg
1 Tablespoon Lemon juice
1/2 teaspoon vanilla
I recipe pie crust
Gently stir together all ingredients. Allow to sit for a few minutes for the berries to release some of their juices, then stir again. All the sugar and flour should be moist.

Bake at 350 degrees for about an hour, or until crust is lightly golden and fruit filling is bubbling.

Enjoy! (sorry for the lack of pictures, I'm having a few computer issues!)

Wednesday, May 30, 2012

Maple Cinnamon Glazed Salmon

I know what your first thought is after reading the title... shouldn't that be in oatmeal? Well, by making this glaze and brushing it onto your salmon, you get a beautiful, sweet crunchy crust on pan seared salmon! I tried this last night with a side of jalapeno polenta and it was delicious! My 3 1/2 year old wolfed it down. I'm so blessed to have access to an amazing amount of salmon from our fishing trip last year - every person on the boat limited out on King Salmon! We go again in a couple of months, so I am trying to use up all of last years fish. I hope we have the same abundance of fish that we had last year! Maybe some more halibut in there too...

Here is my recipe...This made enough to coat 2 or 3 salmon steaks. It is so quick to make that you can always make a little more if you run out, but I hate to waste it once it's contaminated with the fish. I used King salmon, which by far exceeds the Atlantic salmon for flavor and texture!

Maple Cinnamon Glaze for Salmon

2 Tablespoons of Pure Maple Syrup
1 teaspoon Dijon Mustard
1/2 teaspoon ground cinnamon
1/4 teaspoon black pepper
1/4 teaspoon salt

Whisk ingredients together until smooth. Using a a silicone brush, "paint" the mixture onto one side of the salmon. Place salmon glaze side down into a medium-hot grill pan. Paint the other side of the fish while in the pan - this eliminates wasting the glaze! Cook time depends on the thickness of the fish. I usually judge when to flip by how easily it releases from the pan and my looking at the side of the fish. it should be opaque almost halfway up the sides before you flip. You can serve additional glaze on the side, just make sure that it hasn't been mixed with the raw salmon.


Maple Cinnamon Glazed King Salmon
This glaze would be amazing on many thing! I think scallops and shrimp would be delectable too! I would love to hear what you think and if you try it on any other seafood or chicken!
Enjoy!

Monday, April 30, 2012

Tapioca Pudding

Tapioca. What is it? It is the starchy root of the cassava plant, dried and formed into small pearls. Quick tapioca has been ground down to small chunks and works best for thickening fruit pies. Small Pearl Tapioca is ideal for tapioca pudding because they are the perfect size. Large pearl tapioca is what is used in making bubble tea.
First off, I really enjoy tapioca pudding! Not too sweet or heavy, just the right creamy and textured treat! It's so hard to find a good recipe, so today I finally just created one to my liking... Here is my recipe:

Tapioca Pudding

2 eggs
1/2 cup sugar
4 cups milk
1 cup  Small Pearl Tapioca
Pinch of nutmeg
1 teaspoon vanilla
1 tablespoon butter (optional)

Combine the eggs and sugar, beat until smooth. Whisk in milk, then stir in tapioca and nutmeg. Allow to soak under refrigeration for at least 30 minutes, I find an hour or two makes the pearls more tender.
After soaking, cook over medium heat, stirring constantly, until mixture comes to a boil. Boil for about a minute, until pudding has thickened. It will thicken more on cooling. Remove from heat and stir in vanilla and butter. May be enjoyed warm or chilled.

This version beats the store-bought version hands down in texture and flavor! And another perk: it's gluten free! This does get fairly thick, so if you prefer it less thick, simply cut back the tapioca by as much as half. Enjoy!


Beautiful Tapioca Pudding made with fresh farm eggs