Thursday, October 27, 2011

Pumpkin Spice Latte, Part 2

Since I know I can make my own latte, I decided to take the next step - make my own Spiced Pumpkin Coffee Syrup. I compared it to the store bought version, Torani, and the sweetness appears to be the same, but the flavor is much better! And, no preservatives! Here is my recipe for the syrup...

Spiced Pumpkin Coffee Syrup
2 cups sugar
1 1/2 cup water
1/4 cup canned pumpkin
1 cinnamon stick
1" square of fresh ginger
1-2 cloves
1/4 teaspoon nutmeg

In a saucepan, combine all the ingredients. Bring to a low simmer and stir to dissolve sugar. Once dissolved, simmer for an additional 2 minutes. We aren't reducing it, just steeping the spices. Remove from heat and allow to cool to room temp. Strain into a clean glass container, and store in the fridge. Make 500ML or 2 cups. For a more spicy flavor, rinse off the cinnamon stick and leave it in the syrup overnight.


One Batch of Spiced Pumpkin Coffee Syrup fits perfectly into a pint jar

So, for the price breakdown, this is much more cost efficient!

Here is what the prices are based on...

Sugar - 10lbs for $13.88
Canned Pumpkin - 15oz for $2.39
Water - free
Cinnamon Stick - 2lbs for $13.49
Fresh Ginger Root - 1lb for $3.99
Cloves - 1lb for $14.56
Nutmeg - 2.3oz for $10.56


So, for my recipe, here is the breakdown:
2 cups of sugar = 7oz -  $0.607
1/4 cup pumpkin = 2.25oz - $0.359
1 cinnamon stick= 1/8oz - $0.053
1 inch ginger = approx 1/4oz - $0.062
2 cloves = trace - $0.01
1/4 teaspoon nutmeg = 1/32oz - $0.143

Total Cost for 500ML :  $1.23
Cost for 500ML Torani Syrup:  $5.07

That is a total savings of $3.84! Think how much that would add up...
These prices were based on Amazon.com prices, but I am sure that some of this would even be cheaper in your local grocery store or Costco.

So, who says you can't make your own coffee flavoring?  This also makes a great hostess or Christmas gift for a coffee lover in your family! Try this on pancakes too...

I hope you enjoy! I'd love to hear feedback from recipes, so feel free to leave a comment on what you have tried off of my blog!
Sunday, October 23, 2011

Maple Bars

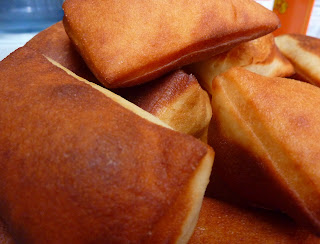
Come the fall, I tend to crave comfort foods. Homemade maple bars are definitely on that list! I make mine with a slightly sweet yeast dough that I deep fry. I top it with a creamy frosting made almost entirely from real maple syrup.

First off, here is the dough recipe... It is based loosely on a recipe from my childhood called Monkey Bread.

Maple Bar Dough
1 cup warm milk
1/3 cup sugar
1 1/2 teaspoons yeast
1/4 cup oil
1/4 cup melted butter
3 eggs
5-6 cups flour
1 teaspoon salt
2-3 quarts of mild oil, for deep frying
(peanut, canola, soybean, coconut, safflower - just make sure you are not using extra virgin, as it will likely burn)

"Bloom" (fancy word for dissolve and let it do it's thing) the yeast in the warmed milk (110 degrees). I usually allow this to sit for a good 10 minutes. Add the sugar, oil, and 2 1/2 cups of flour, and the salt. Beat well to combine, then add the eggs one at a time, beating after each addition. Add enough flour to form a smooth dough. I use my stand mixer to knead the dough, but you can do it on a lightly floured surface too. Place into a lightly oiled bowl and allow to raise in a draft free, warm place until doubled in size. Once it's raised, gently push to deflate the dough. Roll the dough out to about 1/2 - 3/4" thick, then cut into rectangles, about 3" by 4". I prefer to go smaller, then I don't feel so guilty eating them!  Allow to rest for about 10 minutes. Heat oil in a large, deep sauce pan. Make sure your pan is deep enough to only fill it 2/3 full of oil, so you don't risk overflowing the pan. Oil should be fairly hot, about 350 - 375 degrees. Drop a few dough squares at a time into hot oil. These will cook quick, so make sure you watch them. Cook about 1 minute one each side. If you aren't sure how long to cook them, just cook 1 to start with, then taste for doneness. Fry all the bars in batches, allow to cool, then frost with Maple Syrup Icing. The dough may also be divided and frozen, or baked up into a number of other items, such as dinner rolls, cinnamon rolls, or other sweet bread applications.


Fresh-made Maple Bars

And to top these off, a fantastic REAL Maple Syrup Icing. Why use maple flavoring when you can use the real stuff?

Maple Syrup Icing

1 cup of maple syrup
1/4 teaspoon milk

Bring the maple syrup and milk to a boil, and boil about 4 minutes. Pour mixture into a bowl and whip with an electric mixer until mixture is light colored and thickened. If icing gets too thick, just add a little more maple syrup. This icing will dry out as it sits and thicken dramatically, so try to use the icing soon after it's made. Remember, this is fairly sweet, so you don't need much on the maple bars.


Maple Bars

Saturday, October 8, 2011

Tomato Basil Quinoa

It was recently requested that I come up with some recipes using quinoa. What is quinoa? It is an ancient seed, full of fiber and protein. It is related to spinach and chard and is native to the Andes mountain region of South America. It comes in several colors: red, yellow, brown, black, and ivory. Quinoa is coated in a bitter powder and must be rinsed before cooking, otherwise your whole pot of quinoa will be bitter.

Tomato Basil Quinoa
1 1/2 cups rinsed quinoa
3/4 cup tomato sauce
2 1/2 cups water or chicken or vegetable stock
1/2 teaspoon basil
Pinch of salt
Black pepper
Fresh ribbons of basil, for topping

Combine quinoa, tomato sauce, water, dry basil, salt and pepper. Cook over medium-low heat for approximately 25 minutes, until all the liquid is absorbed and the "tail" of the quinoa has broken free of the seed. You will see little while "commas" in the pan. Fluff with a fork, transfer to serving bowl and top with fresh basil. This pairs well with almost any meal! If desired, grate a little parmesan, pecorino, or ricotta salata over the top for a salty kick.
Tomato Basil Quinoa

Friday, October 7, 2011

The Beauty of Canning Season

With bountiful harvest, comes all the work of preserving it. Sometimes, admittedly, it's tough to stay motivated. Once all the jars begin to stack up, I get a real sense of accomplishment! How much money I saved by making my own and how much better it is for my family are two of the best reasons! The fact they look beautiful - just a bonus.
One thing I experimented with this year was Yellow Tomato Sauce, made from "Lemon Drop" Heirloom tomatoes. It turned out so sweet! And, as a bonus, it's a gorgeous golden color! I thought I would share a picture of some of my work, it truly gives me joy to see all the delicious stuff that I get to enjoy this winter!

San Marzano Roma Tomato Sauce, "Lemon Drop" Tomato Sauce,
and Home-Grown French Cut Green Beans

Sunday, October 2, 2011

Bacon Blue Green Beans

Canning season is in full swing! I have been very busy, but wanted to post a recipe to share. As with every crop that you preserve, there always seems to be that last little bit left over that doesn’t quite fill a jar. Tonight, it was green beans! I decided to combine two of my favorite flavors that work so well together: Bacon and blue cheese.
For this recipe, you can use either small, tender green beans, or larger ones cut “French-style”, which basically means cutting them length-wise. You can use a bean Frencher, or just cut them by hand. Here is the recipe for Bacon Blue Green Beans.

First, chop up one thick slice of bacon into small pieces. You can do two it you want, but I didn’t want to obliterate all the healthiness of green beans… Add bacon to a hot pan, ad a few cracks of freshly ground black pepper, and sauté until mostly cooked. Depending how much fat is rendered, you may need to use a couple teaspoons of olive oil; I used 1 scant tablespoon of olive oil. Add 2 cloves of garlic, thinly sliced, and cook for about 20 seconds. Add 4 cups of green beans. Cook and stir until green beans are bright green and tender. Remove from heat and stir in 2 tablespoons of crumbled blue cheese. I used gorgonzola. Serve warm. Makes 4-6 servings.

Sauteing the bacon, pepper, and olive oil


The combination of blue cheese and bacon is very common, probably because they are both so salty and dominant. I hope you try this colorful side dish the next time you are wondering what to do with those green beans!
Bacon Blue Green Beans