Thursday, December 29, 2011

Whipped Orange Nutmeg Butter

I apologize for the lack of post lately! I have been immersed in the holidays, as well as tending to our litter of puppies born October 12.... all 15 of them!
I hope my photography skills will begin to improve as well! I received a DSLR camera from my husband as a Christmas present! I am looking forward to higher quality photos to put on my blog!

For dinner tonight, I decided to roast some sweet potatoes. I simply make a couple of small slits in the sweet potatoes, then place them in a 350 degree oven until they are tender. I usually put a piece of foil underneath them while they roast, since they will caramelize and "ooze" a bit of goodness onto the bottom of your oven.

To make the whipped butter, I decided to try something my sister had told me - whipping butter with coconut oil. But, as is my nature, I couldn't make plain butter! Here is the recipe...

1/4 cup butter, softened
1/4 cup coconut oil (I didn't use extra virgin)
Pinch of salt (I used Himalayan pink salt, ground to a powder in a mortar and pestle)
1/2 teaspoon freshly grated orange zest (I used satsuma zest)
1/4 teaspoon freshly grated nutmeg

Place butter in a bowl, and beat for a second to smooth the texture out. Add the coconut oil, and whip together until fluffy looking.  Season to taste with salt. You can stop here and have just a plain whipped butter. Simply stir in the flavors (zest and nutmeg) and scoop into a serving dish. Chill until service time. For softer butter, simply remove from the fridge about an hour before service.

Coconut oil is a very healthy oil and by mixing it with the butter, it still retained the buttery flavor and creamy texture. The salt is optional, but I felt that it made it taste like true butter. As with most compound or flavored butters, you can change up the flavor combinations.  Different citrus zests, herbs, spices - endless possibilities!
Whipped Orange Nutmeg Butter

Tuesday, December 6, 2011

Red Hot Cinnamon Candy Popcorn

I thought some of you might enjoy this... It's very festive for the holidays! Though it's not my recipe, I did alter it slightly...

In case any of your are interested, I thought I would share a favorite recipe of mine... I didn't make this up, it's out of a cookbook, but it's a fun change from your normal caramel corn!
Red Hot Cinnamon Candy Popcorn
8 quarts popped popcorn
12 oz package red cinnamon candies
+ enough sugar to fill up a 2 cup measure
1 cup butter
1/2 cup corn syrup
1/2 teaspoon baking soda
Spread Popcorn onto a lightly buttered roasting pan; bake at 250 degrees while preparing syrup. Pour cinnamon candies into a 2 cup measure, then fill remainging space to the top with sugar. Place in a heavy saucepan and add butter and corn syrup. Bring to a boil and boil for 5 minutes. Remove from heat and carefully stir in baking soda. Pour over popcorn and stir to coat. Bake in a 250 degree oven for 1 hour, stirring every 15 minutes. Remove from oven and let cool. Break apart and store in an airtight container.
I hope you all enjoy! I love this recipe!

Sunday, November 27, 2011

Turkey and Apple Cranberry Sauce

I love the holidays and the delicious food that comes with them! While my Thanksgiving was a little late, it was still wonderful! I took the time to brine my little 9lb turkey and what a difference it made!  Even though I misjudged time and overcooked the turkey, it was still moist and flavorful. I made the brine the day before I cooked the turkey and allowed it to marinate overnight, about 12 hours. Here is my recipe…

Turkey Brine 
¾ gallon water
1 cup apple cider
1 ¼ cup salt (canning and pickling salt is perfect)
¼ cup brown sugar
½ cup white vinegar
1 tablespoon peppercorns
1 tablespoon allspice berries
2 tablespoons pickling spice
10 fresh sage leaves
2 quarts ice

Heat the salt and sugar with ½ gallon of water. Add cider, vinegar, spices, remaining water and ice to food safe bucket or other large vessel. Once sugar and salt are dissolved, add to bucket with remaining ingredients. Add turkey and weigh down with a plate to keep turkey submerged. You may need a gallon freezer bag or other container to set on the plate to help weigh it down. Brine about 12 hours for a small bird, or up to 24 for a large bird. Remove bird from brine at least a couple of hours before cooking and rinse thoroughly. Refrigerate uncovered until cooking time – this will help dry out the skin so it can crisp up during roasting. You may add herbs or other spices to give the skin flavor… I used thyme, sage, pepper, and butter. Be sure to pat the skin dry before rubbing with spices.


The turkey is never complete without the cranberry sauce on the side! While canned cranberries have their place, I much prefer fresh made cranberry sauce! Here is my recipe for my Apple Cranberry Sauce.

Apple Cranberry Sauce
1 12oz bag fresh cranberries
1 ½ cups peeled and diced apple (about the same size of cranberries)
1 ¼ – 1 ½ cup sugar – to taste
1 cinnamon stick
¼ teaspoon nutmeg
1 teaspoon grated fresh ginger

Combine all ingredients in a saucepan, but start with only 1 cup of sugar. You can always add more later! Heat over medium low heat until apples are tender and cranberries have burst. Sauce will be fairly thick. Taste for sweetness, then add additional as necessary. I used about 1 1/3 cups sugar with mine batch. Stir to dissolve additional sugar, and then cool. Serve chilled or at room temperature. No thickening is necessary, as both the apples and the cranberries contain pectin that will naturally thicken the sauce!

Cranberries, apples, sugar, and aromatic spices

This cranberry sauce if so versatile! The apples absorb the colors from the cranberries and make this sauce so elegant. I love using leftovers in different ways and this cranberry sauce recipe is great in many things! Think cheesecakes, trifles, on sandwiches, pureed and used in cocktails… so many uses!
Finished Apple Cranberry Sauce

I hope you enjoy these recipes! And, thank you all for supporting me in this blogging endeavor!

Thursday, October 27, 2011

Pumpkin Spice Latte, Part 2

Since I know I can make my own latte, I decided to take the next step - make my own Spiced Pumpkin Coffee Syrup. I compared it to the store bought version, Torani, and the sweetness appears to be the same, but the flavor is much better! And, no preservatives! Here is my recipe for the syrup...

Spiced Pumpkin Coffee Syrup
2 cups sugar
1 1/2 cup water
1/4 cup canned pumpkin
1 cinnamon stick
1" square of fresh ginger
1-2 cloves
1/4 teaspoon nutmeg

In a saucepan, combine all the ingredients. Bring to a low simmer and stir to dissolve sugar. Once dissolved, simmer for an additional 2 minutes. We aren't reducing it, just steeping the spices. Remove from heat and allow to cool to room temp. Strain into a clean glass container, and store in the fridge. Make 500ML or 2 cups. For a more spicy flavor, rinse off the cinnamon stick and leave it in the syrup overnight.


One Batch of Spiced Pumpkin Coffee Syrup fits perfectly into a pint jar

So, for the price breakdown, this is much more cost efficient!

Here is what the prices are based on...

Sugar - 10lbs for $13.88
Canned Pumpkin - 15oz for $2.39
Water - free
Cinnamon Stick - 2lbs for $13.49
Fresh Ginger Root - 1lb for $3.99
Cloves - 1lb for $14.56
Nutmeg - 2.3oz for $10.56


So, for my recipe, here is the breakdown:
2 cups of sugar = 7oz -  $0.607
1/4 cup pumpkin = 2.25oz - $0.359
1 cinnamon stick= 1/8oz - $0.053
1 inch ginger = approx 1/4oz - $0.062
2 cloves = trace - $0.01
1/4 teaspoon nutmeg = 1/32oz - $0.143

Total Cost for 500ML :  $1.23
Cost for 500ML Torani Syrup:  $5.07

That is a total savings of $3.84! Think how much that would add up...
These prices were based on Amazon.com prices, but I am sure that some of this would even be cheaper in your local grocery store or Costco.

So, who says you can't make your own coffee flavoring?  This also makes a great hostess or Christmas gift for a coffee lover in your family! Try this on pancakes too...

I hope you enjoy! I'd love to hear feedback from recipes, so feel free to leave a comment on what you have tried off of my blog!

Sunday, October 23, 2011

Maple Bars

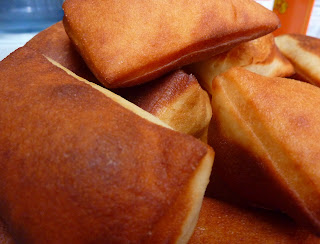
Come the fall, I tend to crave comfort foods. Homemade maple bars are definitely on that list! I make mine with a slightly sweet yeast dough that I deep fry. I top it with a creamy frosting made almost entirely from real maple syrup.

First off, here is the dough recipe... It is based loosely on a recipe from my childhood called Monkey Bread.

Maple Bar Dough
1 cup warm milk
1/3 cup sugar
1 1/2 teaspoons yeast
1/4 cup oil
1/4 cup melted butter
3 eggs
5-6 cups flour
1 teaspoon salt
2-3 quarts of mild oil, for deep frying
(peanut, canola, soybean, coconut, safflower - just make sure you are not using extra virgin, as it will likely burn)

"Bloom" (fancy word for dissolve and let it do it's thing) the yeast in the warmed milk (110 degrees). I usually allow this to sit for a good 10 minutes. Add the sugar, oil, and 2 1/2 cups of flour, and the salt. Beat well to combine, then add the eggs one at a time, beating after each addition. Add enough flour to form a smooth dough. I use my stand mixer to knead the dough, but you can do it on a lightly floured surface too. Place into a lightly oiled bowl and allow to raise in a draft free, warm place until doubled in size. Once it's raised, gently push to deflate the dough. Roll the dough out to about 1/2 - 3/4" thick, then cut into rectangles, about 3" by 4". I prefer to go smaller, then I don't feel so guilty eating them!  Allow to rest for about 10 minutes. Heat oil in a large, deep sauce pan. Make sure your pan is deep enough to only fill it 2/3 full of oil, so you don't risk overflowing the pan. Oil should be fairly hot, about 350 - 375 degrees. Drop a few dough squares at a time into hot oil. These will cook quick, so make sure you watch them. Cook about 1 minute one each side. If you aren't sure how long to cook them, just cook 1 to start with, then taste for doneness. Fry all the bars in batches, allow to cool, then frost with Maple Syrup Icing. The dough may also be divided and frozen, or baked up into a number of other items, such as dinner rolls, cinnamon rolls, or other sweet bread applications.


Fresh-made Maple Bars

And to top these off, a fantastic REAL Maple Syrup Icing. Why use maple flavoring when you can use the real stuff?

Maple Syrup Icing

1 cup of maple syrup
1/4 teaspoon milk

Bring the maple syrup and milk to a boil, and boil about 4 minutes. Pour mixture into a bowl and whip with an electric mixer until mixture is light colored and thickened. If icing gets too thick, just add a little more maple syrup. This icing will dry out as it sits and thicken dramatically, so try to use the icing soon after it's made. Remember, this is fairly sweet, so you don't need much on the maple bars.


Maple Bars

Saturday, October 8, 2011

Tomato Basil Quinoa

It was recently requested that I come up with some recipes using quinoa. What is quinoa? It is an ancient seed, full of fiber and protein. It is related to spinach and chard and is native to the Andes mountain region of South America. It comes in several colors: red, yellow, brown, black, and ivory. Quinoa is coated in a bitter powder and must be rinsed before cooking, otherwise your whole pot of quinoa will be bitter.

Tomato Basil Quinoa
1 1/2 cups rinsed quinoa
3/4 cup tomato sauce
2 1/2 cups water or chicken or vegetable stock
1/2 teaspoon basil
Pinch of salt
Black pepper
Fresh ribbons of basil, for topping

Combine quinoa, tomato sauce, water, dry basil, salt and pepper. Cook over medium-low heat for approximately 25 minutes, until all the liquid is absorbed and the "tail" of the quinoa has broken free of the seed. You will see little while "commas" in the pan. Fluff with a fork, transfer to serving bowl and top with fresh basil. This pairs well with almost any meal! If desired, grate a little parmesan, pecorino, or ricotta salata over the top for a salty kick.
Tomato Basil Quinoa

Friday, October 7, 2011

The Beauty of Canning Season

With bountiful harvest, comes all the work of preserving it. Sometimes, admittedly, it's tough to stay motivated. Once all the jars begin to stack up, I get a real sense of accomplishment! How much money I saved by making my own and how much better it is for my family are two of the best reasons! The fact they look beautiful - just a bonus.
One thing I experimented with this year was Yellow Tomato Sauce, made from "Lemon Drop" Heirloom tomatoes. It turned out so sweet! And, as a bonus, it's a gorgeous golden color! I thought I would share a picture of some of my work, it truly gives me joy to see all the delicious stuff that I get to enjoy this winter!

San Marzano Roma Tomato Sauce, "Lemon Drop" Tomato Sauce,
and Home-Grown French Cut Green Beans

Sunday, October 2, 2011

Bacon Blue Green Beans

Canning season is in full swing! I have been very busy, but wanted to post a recipe to share. As with every crop that you preserve, there always seems to be that last little bit left over that doesn’t quite fill a jar. Tonight, it was green beans! I decided to combine two of my favorite flavors that work so well together: Bacon and blue cheese.
For this recipe, you can use either small, tender green beans, or larger ones cut “French-style”, which basically means cutting them length-wise. You can use a bean Frencher, or just cut them by hand. Here is the recipe for Bacon Blue Green Beans.

First, chop up one thick slice of bacon into small pieces. You can do two it you want, but I didn’t want to obliterate all the healthiness of green beans… Add bacon to a hot pan, ad a few cracks of freshly ground black pepper, and sauté until mostly cooked. Depending how much fat is rendered, you may need to use a couple teaspoons of olive oil; I used 1 scant tablespoon of olive oil. Add 2 cloves of garlic, thinly sliced, and cook for about 20 seconds. Add 4 cups of green beans. Cook and stir until green beans are bright green and tender. Remove from heat and stir in 2 tablespoons of crumbled blue cheese. I used gorgonzola. Serve warm. Makes 4-6 servings.

Sauteing the bacon, pepper, and olive oil


The combination of blue cheese and bacon is very common, probably because they are both so salty and dominant. I hope you try this colorful side dish the next time you are wondering what to do with those green beans!
Bacon Blue Green Beans

Tuesday, September 27, 2011

Pumpkin Spice Latte

Another rainy fall day is upon us here in the Pacific Northwest… With fall comes some of my favorite comforting recipes! As I am sipping my homemade Pumpkin Spice Latte, and thinking of National Coffee Day on September 29th, I thought I would share this delicious money-saving recipe with you all!
First off, I don’t have an espresso machine – they are expensive and cumbersome, and I have only a vague idea how to use them. While they too can make a great latte, I have found an easy way for me to do the same.
I use a Stovetop Espresso Maker, which makes a few servings of espresso. Mine makes about 8 ounces of rich, creamy espresso, using only about 3/4 of an ounce of coffee.

Here is my recipe for my pumpkin spice latte:
8 ounces of milk (I use 2%)
1 ounce of freshly brewed espresso
(I use just shy of 1 1/2 tablespoons)

Heat the milk in a small pan, but do not boil. When milk begins to steam, use a small whisk to work up a little froth. In a mug, add coffee and smallest amount of coffee syrup (you can always add more, but you can't take it away). Add hot, frothed milk and stir. Taste for sweetness and adjust in necessary. Top with freshly whipped cream and/ or a dash of cinnamon or pumpkin pie spice, if desired.

Here is my breakdown of pricing:
Milk $2.60/gallon
Coffee $12.95/13oz
Coffee Syrup $7.95/750ML

Cost per cup:
8 ounces of milk: 16.25¢
1 ounce of espresso: 9.38¢
1 tablespoon coffee syrup: 15.9¢

Total cost of my latte:  $0.42
Cost at espresso stand $3 and higher

What a great deal, right? And, you can customize it to your taste! I get my coffee through Just Love Coffee http://www.justlovecoffee.com/thevannotrics . They support adoptions of children from foreign countries. My brother and his wife are adopting a little one, and if you shop through the link above, you help bring home my niece! The coffee is great too! Today, I used organic/fair trade Peruvian coffee.

This latte recipe can be altered to suit any coffee syrup too! For instance, use white chocolate and raspberry syrups for a tasty latte! The variations are endless, and the money you save by making your own is amazing! Plus, you aren't driving just to buy your latte. Try serving this over ice too - without heating the milk. If I want coffee to go in the morning, I pour all the ingredients into a 2 cup glass measure, then it can be heated in the morning and poured into my travel mug.

Monday, September 19, 2011

Dinner from the Garden

Tonights dinner was inspired completely by my garden! I picked large basket of green beans, several zucchini, a couple of radishes, and a bunch of new potatoes. I love a dinner harvested nearly completely from the garden! The menu consisted of New Potatoes with Fresh Dill, Sauteed Green Beans, and Oven Roasted Zucchini with Crispy Prosciutto.
To make the zucchini, I simply sliced it about 1/2 inch thick. Lightly brush a sheet pan and each zucchini slice with some olive oil. Sprinkle with garlic salt (I used roasted garlic salt). Roast in a 400 degree oven about 15 minutes, until zucchini is tender and lightly golden or longer for more pronounced color. In the meantime, sauté prosciutto in a small amount of butter until crispy. Drain on a paper towel. Top Roasted Zucchini with Crispy Prosciutto.
If you are wondering what Prosciutto is, it is a spiced, dry-cured, aged ham from Italy. Prosciutto means "ham" in Italian. This is usually sliced thin and served raw, but is also great crisped up as in this recipe!

Oven Roasted Zucchini with Crispy Prosciutto
To make the potatoes, place 4 cups of scrubbed small potatoes. Cover with cold water, and inch above the potato level. It's very important to use cold water instead of warm or hot water so that the potatoes cook evenly. Cook over medium heat until potatoes are tender. Toss with 2 tablespoons of butter and 2 tablespoons of chopped fresh dill. Season with salt (I used Murray River Salt) and pepper to taste.


Butter and Fresh Dill

Red, Yellow, and Purple New Potatoes with Butter and Fresh Dill

Monday, September 12, 2011

More on Salt... A Review of Salt from SaltWorks, Inc...

First off, my taste buds are dancing from all the great flavor from dinner tonight! I decided to taste all the samples tonight, in different applications, so I could compare tastes between salts. Here are the list of salts that I was able to try:
Fusion Black Truffle Salt
Fusion Thai Ginger Salt
Fusion Vanilla Bean Salt
Fusion Roasted Garlic Salt
Fusion Wild Porcini Salt
Artisan Fleur de Sel
Artisan Salish Alder wood Smoked Salt
Artisan Alaea Hawaiian Sea Salt
Artisan Hiwa Kai Black Lava Sea Salt
Artisan Murray River Salt

I decided to grill some chicken and choose 2 different salts to try: The Wild Porcini and the Salish Smoked salts. They turned out beautifully, the Salish smoked chicken had a hint of smokiness to it and the flavor was well distributed because of the fine grind. The Wild Porcini lent a distinct mushroom essence to the chicken breast as well as a bit of crunch from the salt crystals.

On the top picture, you can see the Wild Porcini Salt Crystals, compared to the finer Salish Smoked Salt.

The next application I chose was as a finishing salt for zucchini. I stuck with the Hawaiian salts, both the Alaea (red salt) and Hiwa Kai (black salt). They both had an earthiness to them, but the black salt had presentation going for it. It contrasted the food so well and really made a great statement.

Above, is the striking Hiwa Kai Black Sea Salt on Roasted Zucchini.

 Here is the Alaea Hawaiian Salt on Roasted Zucchini     
 
On the grilled bread, I chose 3 salts to showcase. Murray river salt, which has a pleasing peachy-pink color and an interesting flake texture; Black Truffle salt, which actually has pieces of truffles in the salt; and Roasted Garlic salt, not your average garlic salt! I found the Murray River salt to have a great, versatile flavor good on many dishes. The Black Truffle salt was rich in truffle flavor and would lend a gourmet flavor to risotto, pizza, pasta, or whatever your heart desires. The Roasted Garlic salt was perfect for the bread, full of rich garlic flavor infused directly into the salt.

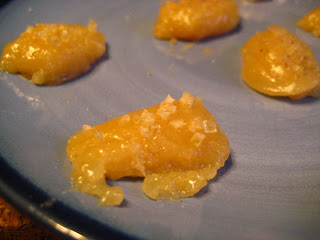
For dessert, we sampled the last few salts on a Maple Caramel. Thai Ginger, Fleur de Sel, and Vanilla Bean. I found the Thai Ginger to be one of my favorites, with the zip of spicy ginger flavor that melded so well into the Caramel. A close second was the Vanilla Bean salt, rich with real Tahitian vanilla beans blended with the salt. Fleur de Sel is a fantastic, somewhat moist salt that was very versatile and probably my husbands favorite on the caramel.
Above is the Thai Ginger Salt

This is the Vanilla Bean Salt - you can see the vanilla! 
      Fleur de Sel

In closing, my review of salt has opened a new world of taste for me! I highly recommend trying some of these fantastic flavors. For a beginner, I would get a universal salt, such as the Murray River, Fleur de Sel, or Himalayan Pink Salt as well as a couple of flavored salts. SaltWorks, Inc encourages you to contact them if you can't find what you are looking for, but I think they carry most anything you could think of! For more varieties or to purchase these salts, check out their website at http://www.seasalt.com/ .  Best of all, they are a local company based in Washington State. I have always felt a strong need to support local businesses and farms. Thank you to SaltWorks, Inc for allowing me to review some of their salts! It was a true culinary pleasure! 

Friday, September 9, 2011

Fresh Blackberry Cheesecake with Zesty Lemon Curd

So, the inspirations for this dessert came from the luscious blackberries dripping off the vine in my backyard and from some lemons I needed to use up! I also came across a dessert photography contest that I have entered this dessert in – I hope I am chosen as a finalist!
To make two of the elements in this dessert, I needed some seedless blackberry puree. To do this, I used my sauce maker! Sauce makers are so versatile, and much easier than forcing berries through a strainer. (If you are interested in what a one looks like, or if you would like to purchase one, check out the Amazon.com widget to the right. I also use this for making applesauce and tomato sauce.) The blackberry puree was used in both the cheesecake and the blackberry sauce used to garnish the plate.
For the lemon elements, I used zest in shortbread crust. I made a lemon curd to go on the plate as well, as an acidic element to cut through some of the richness as well as add a brighter color. Here is how I made the Zesty Lemon Curd:

Zesty Lemon Curd
1 Tablespoon arrowroot powder (or cornstarch)
1 cup sugar
2/3 cup freshly squeezed lemon juice (about 4 large lemons)
Zest of 2 lemons
1 tablespoon Limoncello (optional)
½ cup butter
4 eggs, beaten.
1 teaspoon vanilla

First, stir together the arrowroot and sugar. Add the lemon juice, zest, and limoncello. Add the butter, cut into a few pieces and place over medium heat. Cook and stir mixture until it’s bubbly and thickened. In a medium bowl, beat eggs. Whisk in ½ of the hot lemon mixture, then return the mixture to the rest of the lemon mixture remaining in the pan. Whisking, cook for about 2 minutes. Mixture will be fairly thick. Remove from heat, add vanilla, and pour into a shallow container. Press plastic wrap directly on the surface of the curd, except for a small corner to allow steam to escape. Chill until cool.

This lemon curd is great, not only as an element to my cheesecake dish, but in many other dishes! For a quick dessert, spread the curd into a baked pie shell, top with whipped cream and fresh fruit. Or, fold in a stabilized whipped cream (cream whipped with some gelatin) to some of the curd and pile in a pie shell. Use as a filling for a cake, a topping for waffles, or in Swedish pancakes. Such a versatile ingredient!

To make the sugared blackberries, simply dip your finger into some sticky syrup, such as agave, honey, or corn syrup. Lightly dab the surface of the blackberry, just enough to make it sticky, but not so much that it is dripping. Roll in granulated sugar immediately. Don't make them too far in advance, as they will turn juicy and sticky.

I will keep you all updated if I make finalist for this contest. If I do, I’ll be hitting you all up for votes!
Below is the photo I entered!


Tuesday, September 6, 2011

Lemon Thyme Compound Butter

One of my favorite go-to gourmet fixes is a great compound butter. Basically, its butter with some flavors added to it. The varieties are endless and can range from savory to sweet. I love to make a big batch and keep it in the fridge to liven up a meal. Tonight's dinner is lingcod, topped with a Lemon-Thyme Compound Butter. Cooking of the fish can vary with this technique, so you can poach, steam, pan fry, broil, or cook on the barbeque. Tonight, I decided to pan fry. The fish variety can also be changed; any white fish would be great, even salmon. Here is how I made the butter...
Lemon Thyme Compound Butter
1/2 cup (1 stick) of butter, softened
Zest of 1 lemon
1 tablespoon of fresh thyme, I used lemon thyme
2 tablespoons chopped fresh parsley
1 small garlic clove, finely grated
Salt/pepper to taste (I used smoked salt)

Stir all the ingredients together. On a piece of parchment or plastic wrap, shape the butter into a rough log shape. Roll up and refrigerate until firm. Slice into thin discs, then top hot fish.


Other uses for this butter - add to some angel hair pasta for a quick side dish. Top baby potatoes with a couple discs. Spread on toast - the possibilities are endless!
Dinner is pictured above! Lingcod (caught on the latest fishing trip) with the Lemon Thyme Compound Butter, Green beans (from the garden), and bowtie pasta salad, made with homemade pesto, some sour cream, and some buttermilk. Perfect end to a good day!

Thursday, September 1, 2011

Salt is Salt. Right?

It was not until recently that I began to dabble in the salt world. You think all salt is created equal? Think again... There are so many salts out there! I thought I would share some information on some of them...

All salt is technically sea salt, but the harvesting and refining processes can differ greatly. Salt is made up of Sodium Chloride, but the flavor differences can be from environmental influences or from human influences.

The history of salt is fascinating! Believe it or not, salt has been used longer than history has recorded! Salt is one of the elements that have appeared in the history of almost every other country. Salt has been used for trading, for health, for religion, for status, and for preserving and flavoring foods for years! Now days, salt is still used for health, but also for gardens (Epsom salts), cleaning, ice-melting, cosmetic, spa, and culinary applications.

Salt comes in many different forms, such as flake, fine, coarse, and brick.
Flake salt is processed in a way that the salt appears to look like snow- "flakes". This type of salt is most often used as a finishing salt right before service.

Fine Salt is the salt generally used for baking, as it distributes evenly throughout the baked good. It is also the form of many sea salts and table salts.

Coarse Salt is great for putting in a grinder, providing fresh ground sea salt. Salt in this form is good for high humidity or long storage, as it is not as susceptible to clumping due to moisture.

Brick Salt usually comes in the form of a Himalayan Salt brick. These bricks come in many different shapes, and can be used to serve cold food or cook and serve hot foods. The bricks impart a briny salt flavor to any moist food placed on it. Bricks may be heated on the barbecue and used to sear meats or vegetables. Bricks may also be used to cure fish and seafood. The Himalayan bricks are a beautiful peach/pink color and can be used over and over.

Ok, now onto some salt varieties...

Table salt is probably the least healthy and most refined of salts. It is harvest and highly refined to remove all other minerals. It is then sprayed with an iodine mixture. This practice began in the 1920's during the Depression in conjunction with the government after many people were found to be suffering from Goiter, an enlargement of the thyroid caused by iodine deficiency. Many foods provide natural iodine, so adding the iodine in table salt to your diet is not necessary.


Kosher Salt is named Kosher due to certifications for maintaining guidelines during the processing in accordance with Jewish laws. It is also named because of its applications in the Jewish diet. This salt is not as refined as table salt, and has a larger, flake-like appearance than sea or table salt.

Grey Salt is becoming better known. I personally love to use this variety, as the flavor is much more complex than table salt! The salt has many different varieties, such as Celtic Sea Salt, French Sea Salt, and Grey Sea Salt. This salt has an almost moist texture and comes in coarse and fine varieties. The color appears grey due to the mineral content specific to the harvesting regions. Grey salt also has a lower sodium content, about 83-87%, so it is a better salt for you. The salt is harvested using the traditional Celtic method, off the shores of France and Portugal. The salt farmers or paludiers rake salt that has evaporated from sea water in shallow salt plots called salt pans, in which water has been allowed into by a dike that opens and closes. What sets it apart from most methods is that they use only wooden tools. Metal never touches the salt. The Celtic method goes back hundreds of years!

Fleur de Sel or "Flower of Salt" is a salt harvested in much the same way as grey salt, with the Celtic method. This salt is prized in France and is used all over the world. Fleur de Sel is a creamy off-white color. It is a fine art to harvest this type of salt, as too much movement could cause the salt crystals to sink and ruin the harvest. Fleur de Sel makes a great finishing salt, but is also great in general cooking.


Pink Salt is most commonly Himalayan Pink Salt, but there are also Murray River and Peruvian Pink salts. This is the salt commonly found in the brick form. Pink salt ranges in colors from a pale pink to a deep almost burgundy color. It contains 84 minerals and trace elements, which is why it is said to be so good for you!


Blue Salt comes in one variety - Persian Blue Salt. Blue salt is the rarest of salts, blue-flecked in appearance due to compressed, fractured crystals. Interestingly enough, the salt is not actually blue - it only appears blue. Harvested in Iran, this salt is highly prized for its taste and appearance.

Black Salt comes in 3 varieties - Black Lava, Black Hawaiian, and Kala Namak (pictured at left). Black Lava is a Sicilian salt that is combined with activated charcoal, which gives it its lush, black color. The charcoal also acts as a detoxifier! Black Hawaiian if from Hawaii, but basically the same as Black Lava. Kala Namak is mined in Central India. The salt is rich in minerals that lend a sulphuric taste to the salt. Despite its name, the Kala Namak is a light pink color when ground. 
Hawaiian Salt, also called Hawaiian 'Alaea Salt, is nearly red in color. The volcanic clay added to the salt, called 'Alaea is rich in iron oxide and is where the color of the salt is derived. The volcanic clay adds an earthiness not found in regular sea salt. 

Smoked Salt is a fantastically flavorful salt! The salt is cold-smoked with a variety of natural woods to lend a smoky, fresh-off-the-grill taste to any meal. The smoke coats the salt crystals, turning them a grayish brown. Make sure the salt you buy is truly smoked, not just flavored. Flavoring tends to bitter the salt. While grilling with a gas grill, is convenient, you can't achieve the true smoky flavor as you can in a campfire or over a charcoal grill. But, this gets you almost the same results! This is also great on oysters from the grill...


Flavored Salts are probably one of the most versatile categories! There are so many, some with lemon or herbs, some with sweet flavorings or vegetables, others with truffles or vanilla. Many of these salts can do double duty in the flavor department and work well as a finishing salt.

While I haven't tried all of these salts, I have certainly enjoyed cooking with the ones I have! I look forward to trying some new salts and I hope this inspires you to cook with some of these and change up your normal routine of "Please pass the salt"!


Pictures courtesy of SaltWorks, Inc. Check out their website for some great salt varieties!

Monday, August 29, 2011

Tips and Techniques for Perfect Pizza on the Barbeque

I am a huge pizza fan, but only for homemade. Frozen pizza and delivery pizza just don’t hold up! My house gets so warm in the summer, so I am always cooking outdoors on the barbeque. Pizza is a favorite! I not only make pizza with this crust recipe, but breadsticks and flatbreads.
In light of this, I thought I would share my pizza crust recipe and how I grill them on the barbeque!
Pizza Crust Recipe
3 ½ to 4 cups of all purpose flour
1 ¼ cups warm water
1 tablespoon yeast
½ teaspoon ground black pepper
½ teaspoon sea salt
¼ cup extra virgin olive oil
First, start off by “blooming” 1 tablespoon of yeast in 1 ¼ cups warm water. Make sure the water is not too warm, or you’ll kill the yeast. The water should feel just barely warm. Add the yeast and stir together. Allow to sit for about 5 minutes. You should see some little bubbles on the top.
In a large food processor (or, you can use a mixter, or stir together by hand) fitted with a dough blade, add 3 cups flour and ½ teaspoon each ground black pepper and sea salt. Add ¼ cup extra virgin olive oil. With food processor running, add yeast mixture. This should form a sticky dough. Add ½ -1 cup more flour, until mixture holds together is just barely sticky. Lightly coat a large bowl with olive oil. Form dough into a large ball, place in bowl, turn to coat in oil, and allow dough to raise until doubled in size.


To prep your crust for the barbeque, brush a cutting board with oil. Place a piece of dough on the cutting board, brush the top, then form into a rough circular shape. Flatten into ¼ inch to ½ inch.


Place onto a med grill, directly onto the grate.


Cook for about 1 minute – you will see some large bubbles begin to form, as in picture above.


 .
Flip the crust, then begin topping it with your choice of toppings, beginning with sauce.


Spread the sauce of choice first, then top with assorted toppings, followed by cheese. Close the lid to melt the cheese. Keep an eye on the bottom crust, you don’t want it to burn. If the crust looks like it’s done, pizza can be moved to the top rack in the barbeque to melt the cheese. Remove to a cutting board, slice, and serve! In the picture above, this pizza is topped with a creamy garlic sauce, spinach, grilled zucchini, artichoke hearts, and fresh mozzarella, gorgonzola, monterey jack, and mozzarella cheeses.


 This one is topped with marinara, Canadian bacon, grilled chicken, sliced red pepper, crimini mushrooms, and monterey jack and mozzarella cheeses.
Here are some pizza topping suggestions:
Pepperoni, Canadian bacon, bacon, grilled chicken, sausage,
Grilled zucchini, grilled eggplant, artichoke hearts, olives, pineapple, sliced fresh or roasted peppers, jalepenos, mushrooms, onions, spinach, fresh basil, sliced fresh tomatoes (I love heirlooms!)
Assorted cheeses, such as fresh mozzarella, gorgonzola, Monterey jack, Parmesan, ricotta, and cheddar.


Here is the finished white pizza, topped with some fresh basil once it's removed from the grill. If you add the basil while the pizza is still on the heat, it will turn brown.


And, served it up with a fresh peach daquiri to make a satisfying dinner!

Wednesday, August 24, 2011

Banana Cupcakes with Caramel Cream Cheese Frosting

In honor of Cupcake Day, I decided to make Banana Cupcakes. Better late than never, right? In my defense, my bananas weren't ripe....
This morning, I created a banana cupcake recipe that is awesome! My parents came by today and were able to sample them - and the cupcakes and frosting received high ratings! The frosting turned out a little softer than I would have liked, but I am hoping it firms up a bit after some time to chill.
Here are my 4 tips for a perfect butter-based cake or cupcake:
#1 DON'T overmix or your cake will be tough
#2 Make them by hand - you will tire out before you can overmix them!
#3 Make sure all your ingredients are at room temperature before mixing
#4 No peeking in the oven while the cupcakes bake - it lets too much heat out
 Ever since I started making butter-based cakes by hand, using only a whisk, spatula, or wooden spoon, I have never had a cake fall or come out too heavy. As a bonus, you burn a few calories making it!
Here is the finished cupcake!